

Request a stock update
Open-box · only one available · same 1-year warranty as new · ships from Sugar Land, Texas · US addresses only
- Returned to our US warehouse — the frame's derailleur hanger wasn't a match for the rider's bike.
- Never ridden. The front and rear derailleur mounting bolts show light marks from a test fit.
Everything below describes the same product new. The set itself is the Standard Carbon Cage version.






Specifications
Full technical breakdown of the EDS TX wireless electronic shifter/derailleur kit.
What's in the Box
Both builds include the same core kit. Ceramic Oversized Pulley Cage build includes ceramic bearing oversized pulley wheels instead of the standard 12T pulleys.
×1
EDS TX Electronic Rear Derailleur
×1
EDS TX Electronic Front Derailleur
×2
Integrated Rim Brake Shift Levers — Carbon Fiber (Left + Right)
Included
Ceramic Oversized Pulley Cage (Oversized Pulley Cage build only)
×1
Pogopin Magnetic Charging Cable
×2
CR2032 Button Batteries (pre-installed in shifters)
×1
User Card (scan QR code for digital manual)
Check Your Derailleur Hanger
Please complete these two checks before fitting the WHEELTOP rear derailleur. Only install it once both are confirmed.
Is the Hanger Straight?
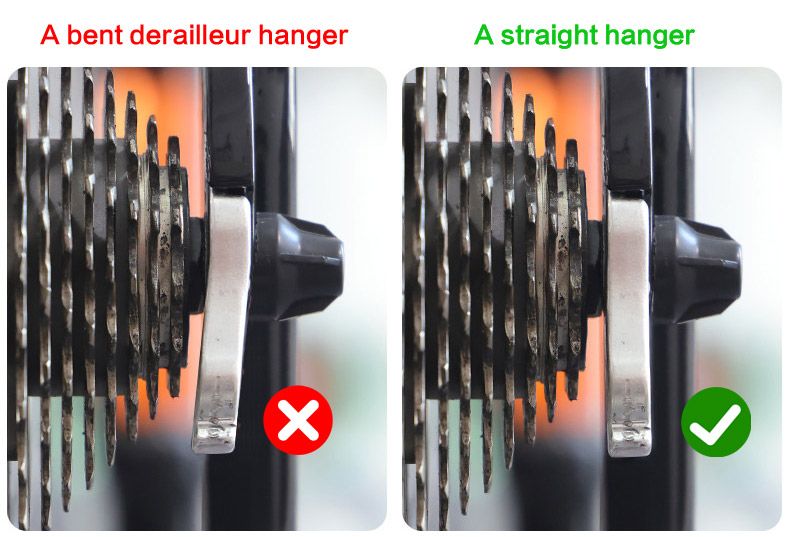
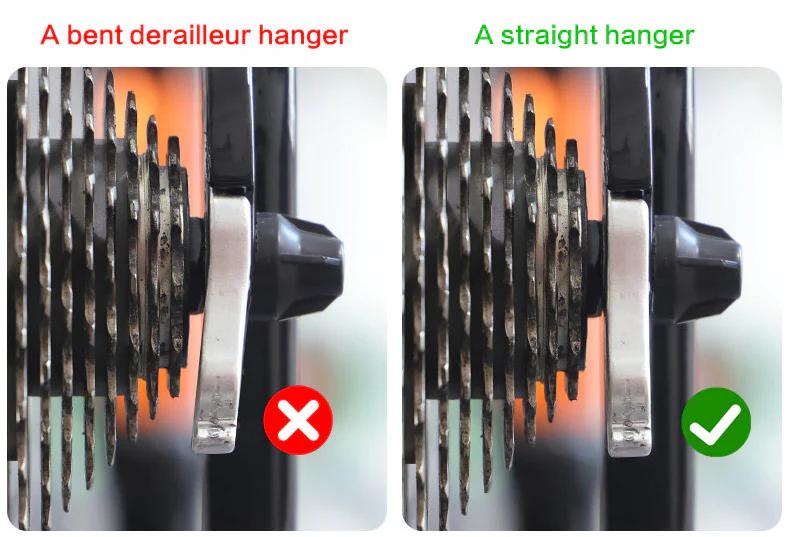
A bent hanger tilts the rear derailleur, which causes poor shifting, chain noise and difficult calibration, no matter how carefully it is set up.
How to check: look from behind the bike. The hanger should hang straight down, parallel to the cassette cogs. If it is bent, straighten it with a hanger alignment tool or fit a new hanger.
Does the Hanger Have a Step?
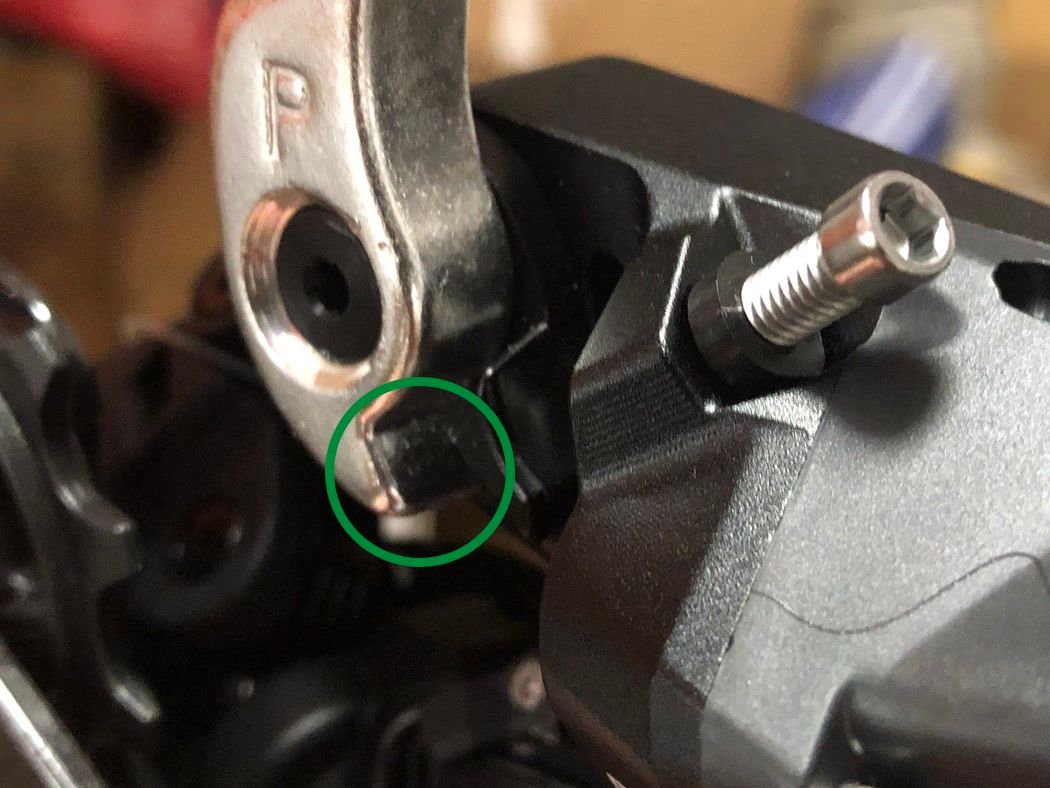
Clear step at the bottom
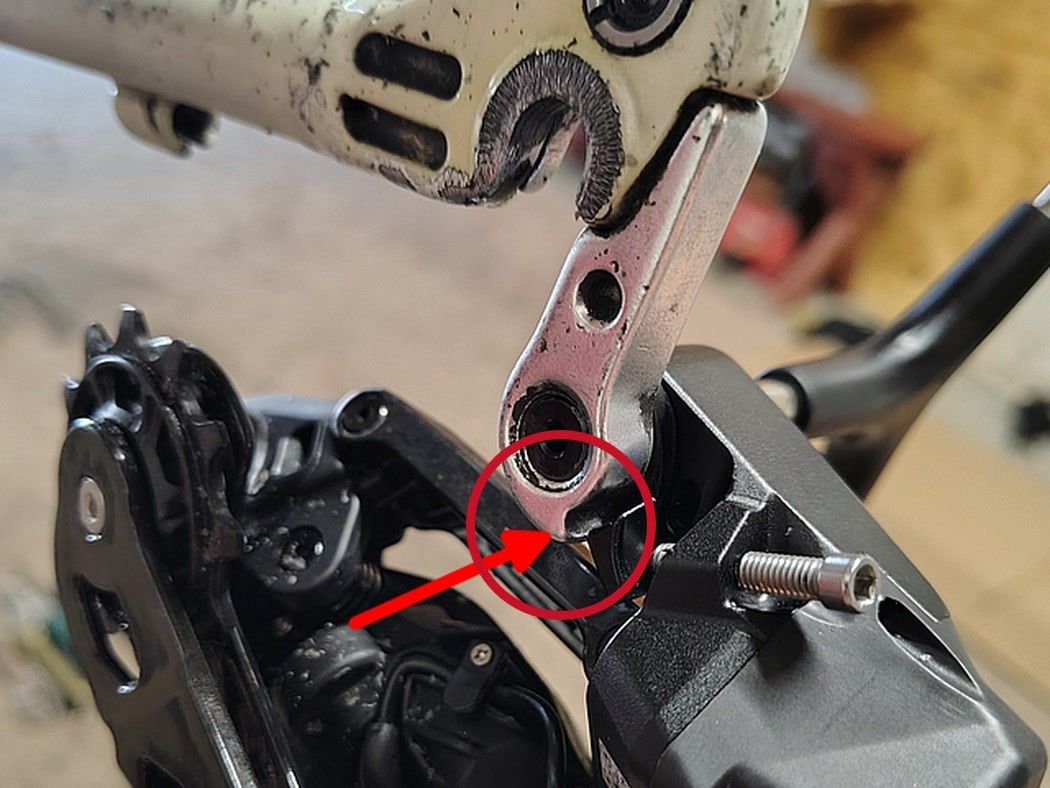
Very small step
The small tab next to the mounting bolt must rest on the step at the bottom of the hanger, so the derailleur can swing forward and back.
Small step? Fit a hanger with a larger step, or a derailleur hanger extender. Otherwise the derailleur stays rigid and cannot be set up.
Not sure? Send us a close-up photo of your hanger through eBay messages before ordering, and we will check it for you.
Compatibility & Buyer Notes
Please review the following before purchasing to ensure correct fitment.
This Listing is for Rim Brake Only
The levers included are rim brake levers — compatible with standard caliper brake cable pull. If you ride a disc-brake frame, please see our separate disc brake listing. Rim and disc brake levers are not interchangeable.
Speed Count Fully Configurable in the App
Speed count isn't fixed by the hardware — set anywhere from 7-speed to 12-speed directly in the WHEELTOP app to match your cassette. Verify your current cassette is 36T or smaller before ordering.
App Pairing Required Before First Ride
After installation, pair both derailleurs to the WHEELTOP app over BLE, set your speed range, and run gear calibration. The app is free on iOS and Android.

WheelTop
How to Calibrate WHEELTOP EDS TX: Complete Electronic Shifting Fine-Tuning Guide
In this guide, I show you how to properly fine-tune your WHEELTOP EDS TX electronic shifting system using the official app. By adjusting the B-tension gap to…
Pedaler
Wheeltop EDS TX: The Best Budget Wireless Groupset? 2-Month Real-World Review
Forget the big-brand tax! After two months and over 1,000km, the Wheeltop EDS TX has proven to be a savior for rim-brake enthusiasts and budget-conscious…
Dave Noakes
The Ultimate Upgrade for Old Rim Brake Road Bikes: Wheeltop EDS TX Wireless Electronic Groupset In-depth Review & Installation Guide
Hey everyone! Today we're doing something big—fully modernizing this traditional 10-speed rim brake road bike. Finding a wireless electronic groupset that…
Pedaler
Did This Chinese Groupset Fail? | WheelTop EDS TX 1-Year Long-Term Review (12,000km)
Stop asking if it’ll break. After 12,000km, the WheelTop EDS TX is still standing strong. It’s handled pro-level efforts without a single hiccup. Yeah, the…
Dave's Cycling
Goodbye Cables! Full Road Bike Conversion from Shimano Ultegra to WHEELTOP EDS TX Wireless Shifting
Want to breathe new life into your road bike? Join me as I install the WHEELTOP EDS TX ! I’ll show you how to ditch those annoying shifter cables and use the…
Simone Montanini Bici
I Tested a €739 Electronic Groupset! WheelTop EDS-TX Deep Review: Can it Really Rival Shimano and SRAM?
I unbox and field-test the WheelTop EDS-TX electronic groupset. Priced at approximately €739, this system is impressively lightweight (beating SRAM Force) and…
Blackwater Cyclist
Is It a Game Changer? WHEELTOP EDS TX Full Review: The 3-14 Speed Wireless Groupset
Disrupting the market? In this video, I’m testing the WHEELTOP EDS TX , the groupset that works with 3 to 14 speeds. I’ll show you how it handles mixed-brand…
Pedaler
[Long-Term Review] Stop Overpaying for Big Brands? Wheeltop EDS TX Real-World Test: Is it Actually Good?
Is Chinese wireless tech actually a contender? After 6 months of crushing Greek climbs, Pedaler proves the Wheeltop EDS TX is no joke. Featuring top-tier…
oz cycle
WHEELTOP EDS TX Installation Guide: Step-by-Step Setup from Hardware to App Sync
Ready to go wireless? Join me as I install the WheelTop EDS TX on a road bike. I’ll guide you through the entire setup: replacing your old mechanical parts,…
David Arthur - Just Ride Bikes
Shimano Finally has a Competitor! WheelTop EDS TX Wireless Groupset Reviewed: The Ultimate Retrofit Upgrade!
In this review, I put the WheelTop EDS TX wireless groupset to the test by retrofitting it onto an older 10-speed bike. Its standout feature is the…
Jamey De Neve 🚲🛠️
WHEELTOP EDS TX Installation Guide & Troubleshooting: Giant Defy Electronic Shifting Setup
In this detailed setup of the WHEELTOP EDS TX on a Giant Defy, I tackle the complexities of integrated cabling and front derailleur clearance issues. By…
The Cycle Workshop
Wheeltop EDS-TX Review: Is This Budget Wireless Groupset a Real Shimano Di2 Killer? (4-Month Long-Term Test)
After 4 months of abusing the WHEELTOP EDS-TX on my gravel hack, I’m sold. Despite some stiff hood rubbers and minor bolt rust, the hardware is over-engineered…
Don't Get Dropped Cycling
WHEELTOP EDS TX Review: The Ultimate Wireless Electronic Shifting Guide & First Ride Test
Ditching cables for the WHEELTOP EDS TX was the best upgrade I’ve made. The installation is clean, the carbon levers feel great for smaller hands, and the…
Which brand of cassette does it support?
The app allows you to customize speed and gear spacing, so in theory it supports 3–14 speed cassettes from all brands.
How to pair the app?
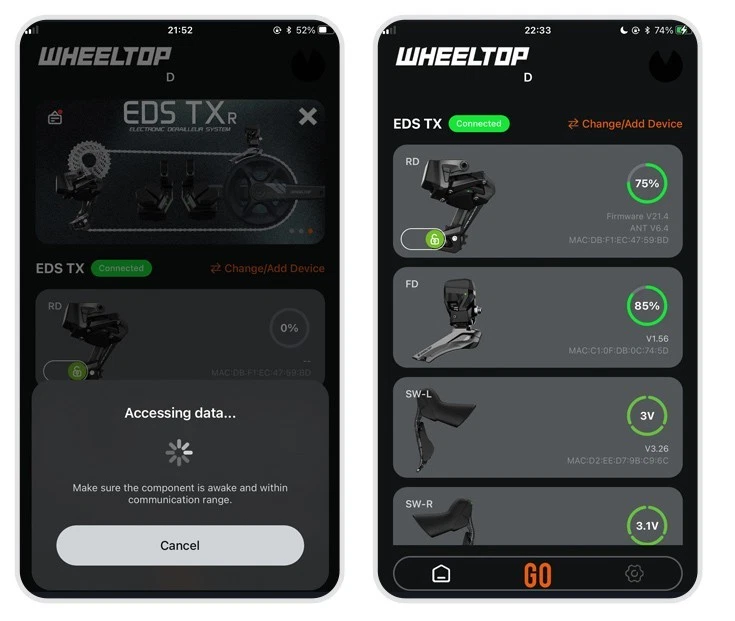
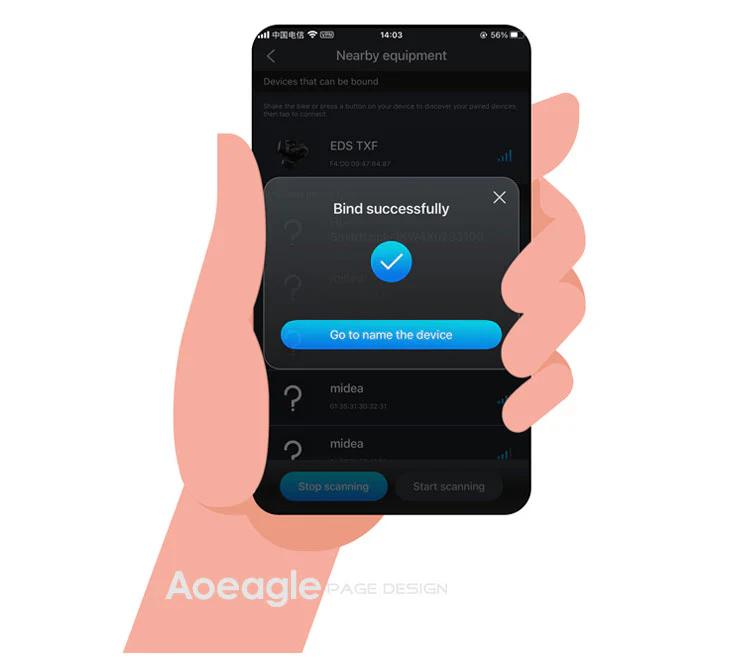
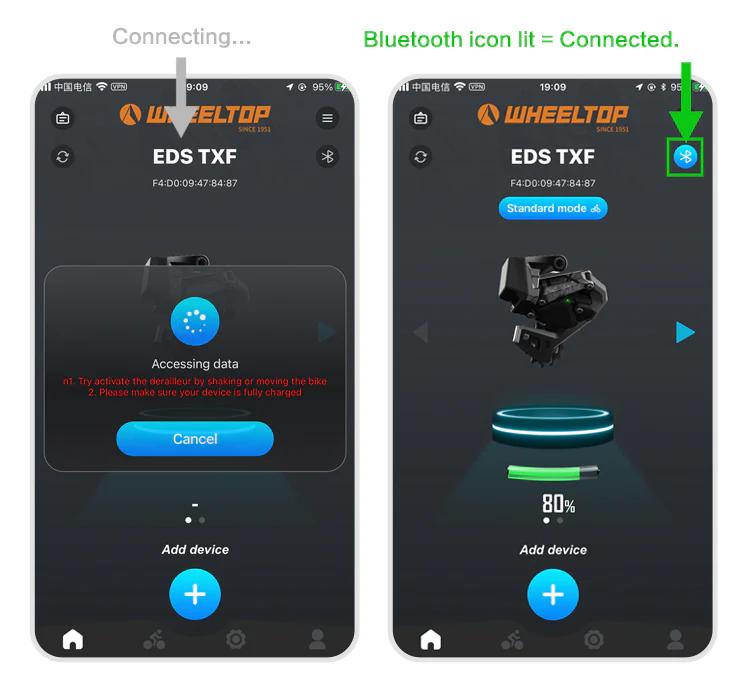
On the home page, click the [Add Device] button. The APP will automatically navigate to the nearby devices list page. Locate your device's MAC address, then click to add and bind it. After successful binding, you will need to name the device.
Step 1: Click the Add button on the home page Step 2: Turn on your phone’s Bluetooth to search for nearby devices
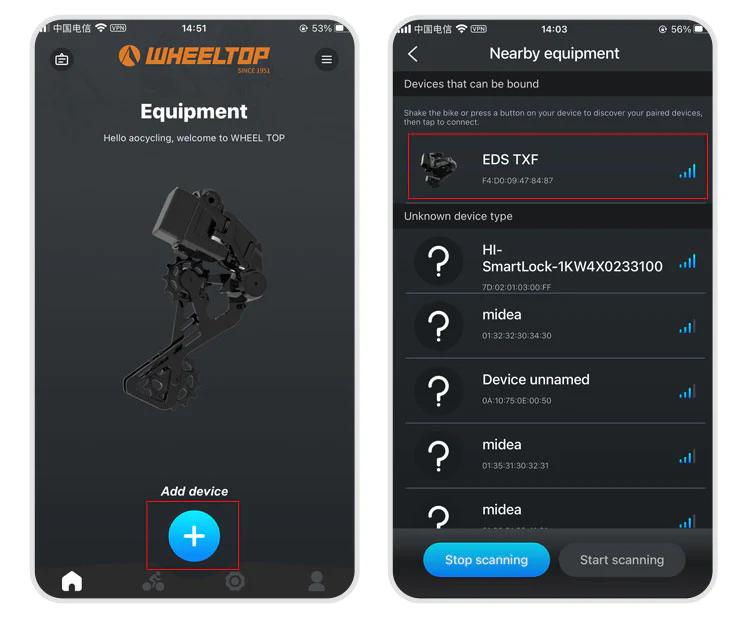
Step 3: Select nearby bindable devices to add Step 4: Name the device
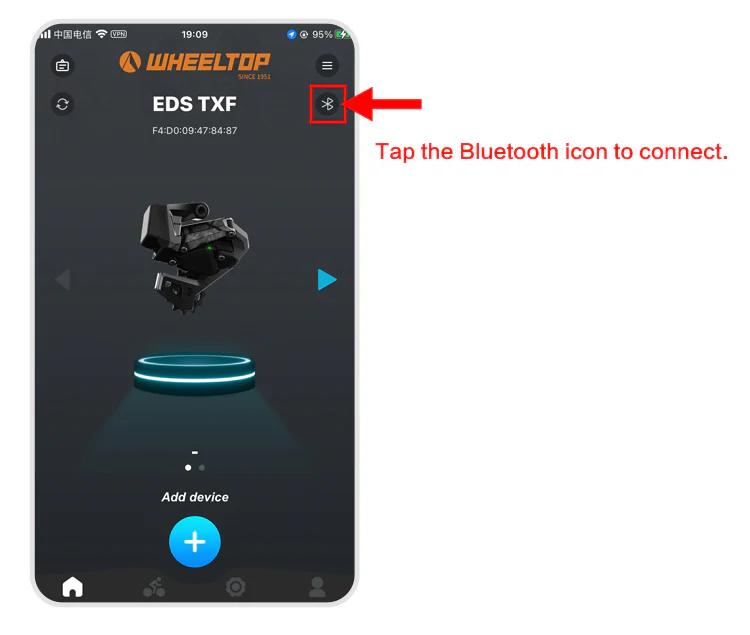
One last thing — and this is where a lot of users get stuck.
To connect, you need to tap the Bluetooth icon in the app. Before doing so, make sure the derailleur hasn't gone into sleep mode. If it has, just give the derailleur a tap or shake the bike to wake it up. Once the connection is successful, the Bluetooth icon will light up — and you're all set to start adjusting your derailleur.
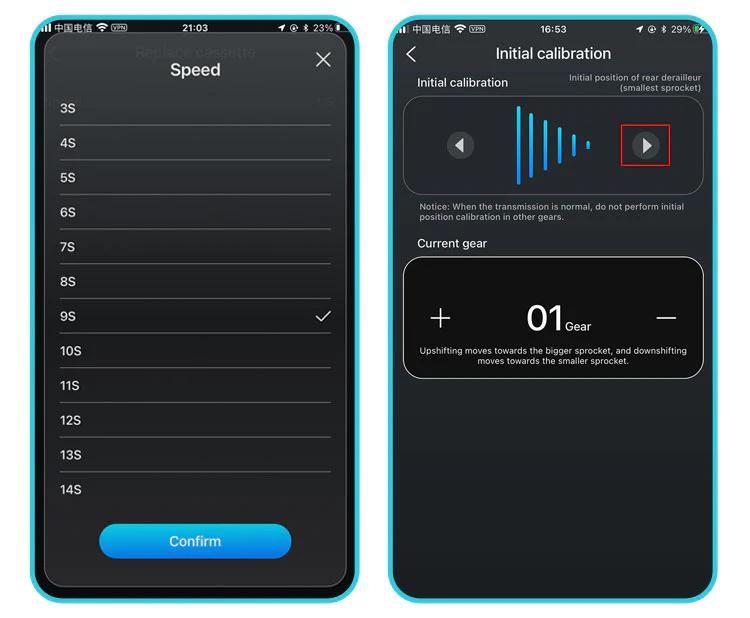
How to do the initial calibration?
For EDS TX series:
- Set the front derailleur to the largest sprocket
- Set the rear derailleur to the smallest cog position
- Open the WHEELTOP App → Initial Calibration
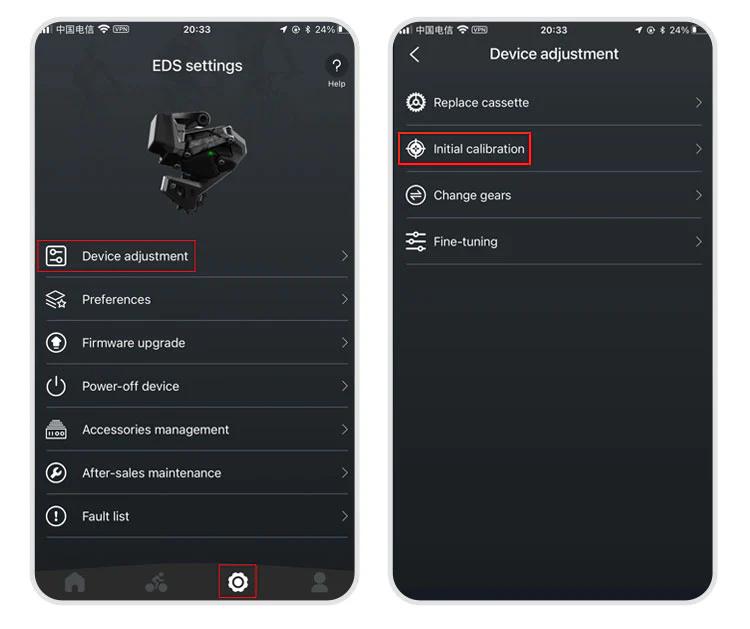
Use "<" or ">" buttons to align the RD pulley with the smallest cog
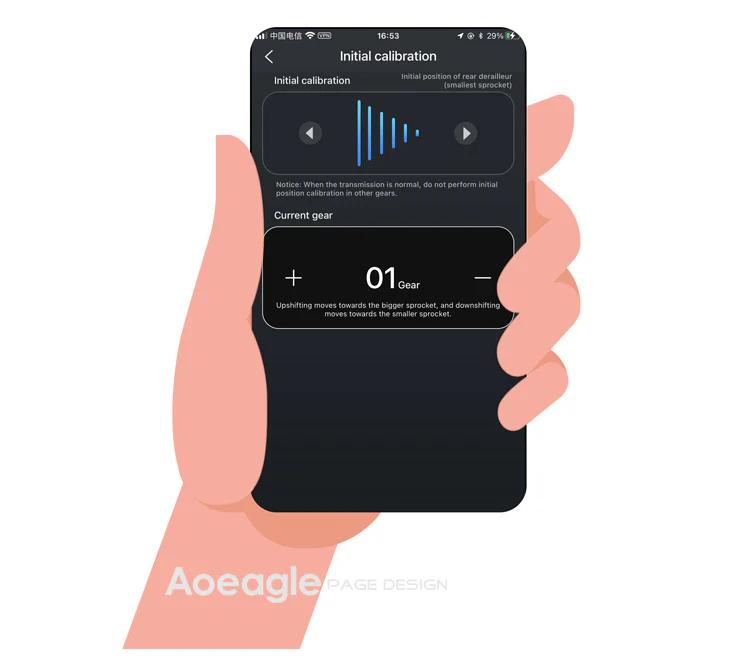
Exit the initial calibration page
For EDS GeX and OX series: Same steps but skip step 1 (no FD adjustment required).
How to download and register the WHEELTOP app?
WHEELTOP APP download:


After successful registration, log in to the app.
You can also download the APK file directly: APK Download Link
For first-time use, please register with your email.
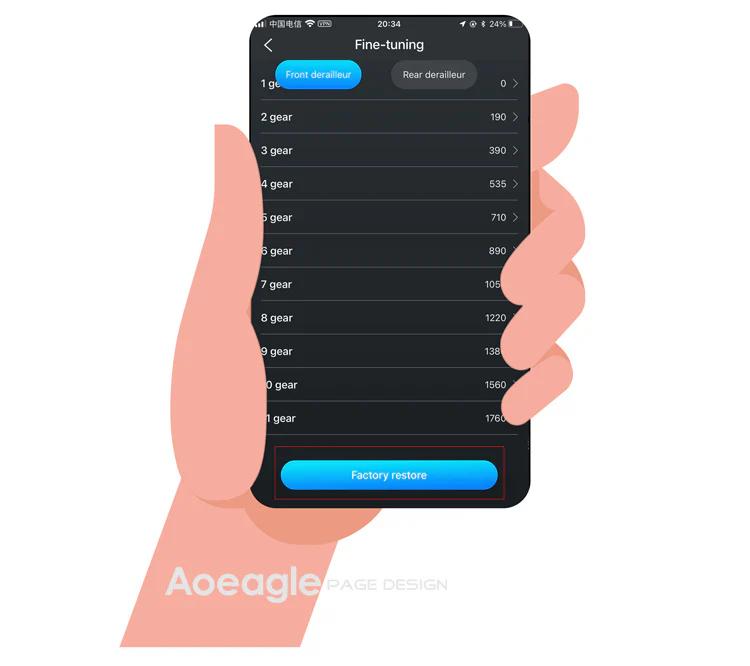
How to perform a factory restore?
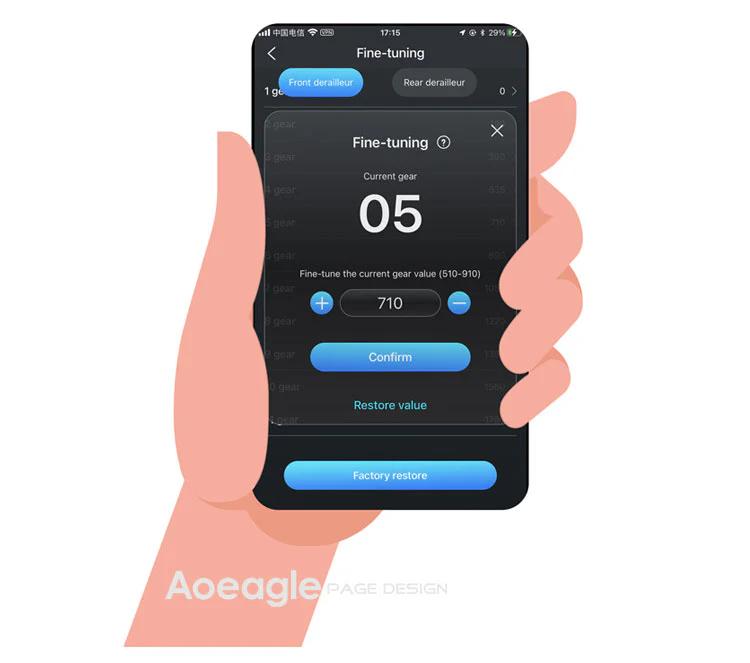
It works like a factory reset for gear values. Use it when gear values have been misadjusted to restore the preset values.
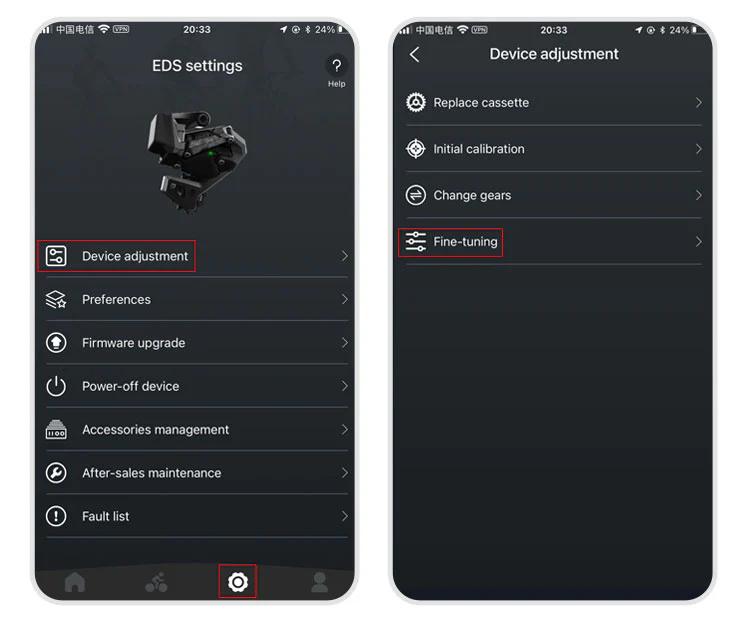
Path: APP → Settings → Device-adjustment → Fine-tuning → "Factory-restore" button at the bottom.
The rear derailleur position is inconsistent with the APP display
1.Go to the initial calibration page in the APP 2.Select the rear derailleur (upper section) 3.Press the right arrow (▶) and hold until the RD moves back to the smallest cassette
More questions (10)
The device cannot shift immediately after not riding for a long time
1.Charge the system — a low battery can delay activation 2.Gently shake the frame — this helps wake up the rear derailleur more quickly
Can EDS be paired with bike computers?
Yes!EDS TX, OX2.0, and GeX can all be paired with bike computers.
How do I power off and power back on my WHEELTOP EDS device?
In the latest version of the WHEELTOP app, swipe left on the rear derailleur's device card to bring up the **Disconnect / Power Off** menu, then tap **Power Off**. This is useful for shutting the system down during shipping or storage. To power the device back on, plug in the magnetic charging cable for **2-3 seconds** — once the charging indicator light turns **red**, the device powers on and reactivates.

How do I achieve the most precise and smooth shifting with my EDS TX groupset?
Getting competition-grade shifting out of the EDS TX takes more than a quick app pairing. Follow this step-by-step setup protocol to make sure your system runs flawlessly across every gear.
Phase 1: Before You Start — Three Golden Rules
1. Derailleur Hanger Alignment
This is the single most important step. Even a slightly bent hanger will prevent the system from shifting with 100% consistency. Use a proper alignment tool or take the bike to your local shop before doing anything else.
2. Keep Your Drivetrain Consistent
For the best results, avoid mixing cassettes and chains from different brands. Matching components means the cassette ramp profiles and chain plates work exactly as intended — and shifting feels it.
3. Waxed Chain? Check for Stiff Links
If you run a waxed chain, make sure there are no stiff links and wipe off any excess wax from the outer plates. Built-up wax can stop the chain from dropping cleanly onto smaller cogs.
Phase 2: Step-by-Step Tuning Protocol
Step 1 — Initial Positioning (Smallest Cog)
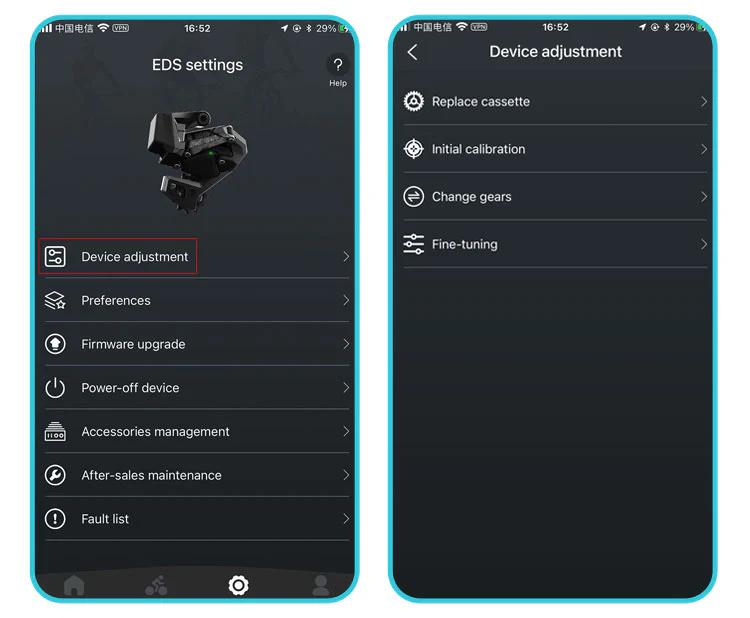
- Select your cassette size in the Wheeltop App.
- Shift the chain to the smallest cog and the largest chainring
- Important: Back the mechanical limit screws out completely — don't use them to set position yet. Let the motor do the work at this stage.
- Use the app's micro-adjustment arrows to align the top jockey wheel directly under the smallest cog until the chain runs completely silent.
Step 2 — Fine-Tuning Across the Cassette (The 10-Unit Rule)
- Open the Fine Tuning section in the app.
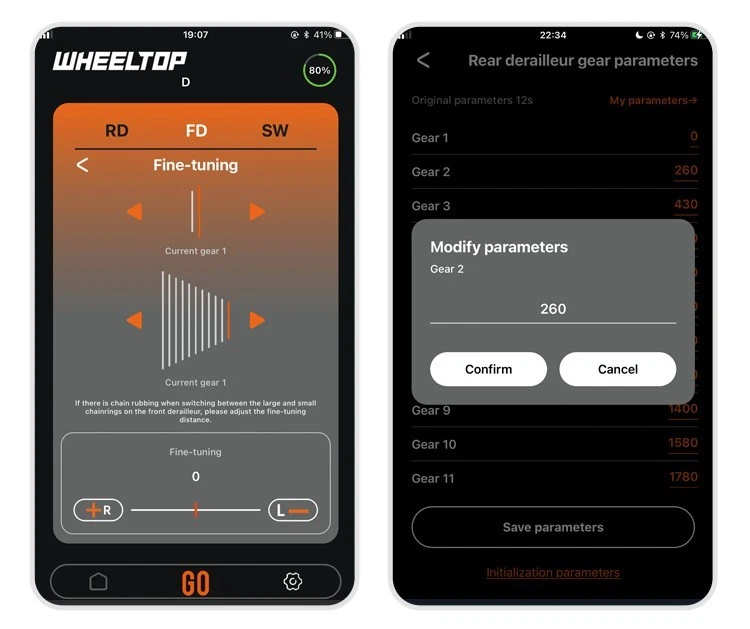
- Shift up one cog at a time. If a shift feels rough or noisy, adjust in increments of 10 units.
Pro TipA new setting doesn't register until you shift back down to the previous cog, then back up to the one you adjusted. Work through the entire cassette this way for a fully "mapped" drivetrain.
Step 3 — B-Gap (Tension Screw) Adjustment
Skip the guesswork of a specific measurement. Instead, dial the B-screw until the jockey wheel is as close to the cassette as possible without any rumble or interference during shifts. Do this check in the smallest chainring, where chain angle is at its most extreme.
Step 4 — Front Derailleur (FD) Calibration
- Use Initial Calibration only for the FD — avoid Fine Tuning unless you have a specific reason.
- With the chain on the smallest cog / large chainring, adjust the FD outward until there's no chain rub — but make sure it doesn't touch the crank arm while pedaling.
Auto-TrimThe EDS TX automatically micro-adjusts the front derailleur as you shift through the rear cassette to prevent chain rub. Some light rub in extreme cross-chain positions (large/large or small/small) is normal — and those combinations are best avoided on the trail anyway.
Step 5 — Mechanical Limit Screws (Safety Backup)
- Only adjust the limit screws after the electronic setup is fully dialed in.
- Thread each screw in until it just makes contact with the derailleur body, then back it off 1/8 to 1/4 turn. This keeps the screw acting as a mechanical stop without interfering with the motor's travel range.
Still getting front derailleur rub? Try slightly loosening the FD mounting bolt, physically rotating the cage by a degree or two, then retightening. A small real-world angle adjustment often solves what software tweaks can't.
Why are there 6 gear values for FD fine-tuning? What do they mean?
- Gear 1st: Press and hold left shifter — FD moves from small to large chainring.
- Gear 2nd: FD on large chainring, RD on smallest 6 cogs — fine position value.
- Gear 3rd: FD on large chainring, RD on largest 6 cogs — fine position value.
- Gear 4th: FD on small chainring, RD on smallest 6 cogs — fine position value.
- Gear 5th: FD on small chainring, RD on largest 6 cogs — fine position value.
- Gear 6th: Press and hold left shifter — FD moves from large to small chainring.
What should I do if the derailleurs are stuck or can't shift?
Use the "Initial Calibration" function in the WHEELTOP app to adjust the front derailleur. Adjustment must always start from the default position.
Correct default position:
- Set the FD at the largest chainring position
- Set the RD at the smallest cog position
- Use the initial calibration function in the app to adjust the FD towards the largest chainring position
Steps in the APP:
- Open the WHEELTOP app → Equipment Debugging → Initial Calibration
- Use the '<' or '>' buttons to adjust the FD guide plate position until correct
How does the rear derailleur linkage function work with limit function enabled?
When the FD is on the large chainring, RD is below 3rd gear, and limit is enabled:
- RD Upshift: System executes an RD upshift once every 0.5 seconds.
- RD Reaches 3rd Gear: The RD upshifts until reaching 3rd gear.
- FD Downshift: Once RD reaches 3rd gear, system waits 2 seconds before executing the FD downshift.
After pressing the shifter lever, the rear derailleur does not shift normally
1.Check the button indicator light: If there is no light, replace the battery and test again. 2.Check the light color: If the button is lit but not green (e.g. red or yellow), the device is not paired correctly. Re-pair following the manual.
What brake systems are compatible with EDS TX?
Cable Brake Groupsets are compatible with rim brakes, V-brakes, U-clamps, and pull-cable disc brakes.
Hydraulic Disc Brake Groupset uses mineral oil, designed for Shimano's hydraulic brake system, compatible with L04C, L05A, and L04A brake pads.
What is the length of brake cables? Are they standard mechanical brake lines?
Our EDS TX/GEX Cable Brake Groupsets use standard mechanical disc brake cables, widely available in the market. Each set includes two brake cables. The length should be sufficient for most bikes.


