

How the WHEELTOP Warranty Works: One Buyer's Question, and What to Check Before You Claim
A rider buying the WHEELTOP EDS TX disc groupset asked how the warranty works and how long it lasts. This is the answer we gave: what's covered, how a claim is handled, and the checks worth running first.


A rider buying the WHEELTOP EDS TX disc groupset asked how the warranty works and how long it lasts. This is the answer we gave: what's covered, how a claim is handled, and the checks worth running first.
The question before the order
A rider writing to us in Italian was ready to order the WHEELTOP EDS TX hydraulic disc groupset. Before buying, they had one question: how does the warranty work, and how long does it last? Anyone buying an electronic groupset online should ask the same thing, so here is the answer in full.
We gave a plain answer, including the bit most people skip: what isn't covered. In the follow-up, the rider said that, since we'd be the point of contact if problems came up, our clear explanation of wear items such as brake pads showed them we were reliable and serious about it. The process is simple once you know it. A few checks will also tell you whether you need to make a claim at all.
What the warranty covers
- Length: one year. This is WHEELTOP's official quality warranty.
- Scope: the electronic shifting components.
- Not covered: brake pads, because they are consumables.
- Who you deal with: us. Everyday questions can come through eBay messages. Fault videos for a claim go by email to support@aoeagle.com, because eBay messages can't carry video. We sell genuine WHEELTOP parts sourced directly from the WHEELTOP factory as a WHEELTOP partner.
How a claim works, step by step
If something goes wrong within the warranty period, a claim goes through three steps, always in this order:
- Email a video of the fault to support@aoeagle.com. Video can't be sent through eBay messages, so email is the route for this step.
- We review the video to confirm it is a genuine hardware fault.
- Once that's confirmed, we arrange a replacement part to be sent out.
We can't promise a replacement part, or a swap for a new unit, until the video has been reviewed. The review is how we confirm that the fault is genuinely in the hardware before anything is sent out. If the cause turns out to be setup rather than hardware, the checks below are the place to start.
Make the video as clear as you can. Film the component and its indicator light, and show the fault actually happening. For a shifting fault, film the drivetrain while you turn the cranks and press the buttons. That way we can see the derailleur move and the lights respond at the same time.

Check these first
These are the checks worth running before a claim is needed. Most of them are simply the official setup steps done in the right order. Our troubleshooting guide covers some of them in more depth.
Nothing responds when it arrives
The groupset is switched off for shipping. Plug in the magnetic charging cable once to wake it up. The kit is also paired at the factory, so you don't need to pair anything on a new groupset. You only need to re-pair if you replace or add a component, and then every component has to be re-paired with the rear derailleur. One TX disc buyer summed it up:
Not installed but came paired
Read the indicator lights
- Shift lever: blue = pairing or fine-tuning mode; green = paired or shifting mode; yellow = low battery; red = battery flat; white = fault.
- Derailleur status light: blue = pairing or fine-tuning mode; green = paired or shifting; yellow = low battery; red = battery flat.
- Derailleur battery light: red = charging or battery flat.
A white light on a lever means a fault. If you see one, get it in your video.
Charging
Open the dust cover and let the magnetic Pogopin cable snap on. A red light means it is charging. When it's full, the light goes out (the TX listing describes it turning green). Use a USB 5V charger rated under 2A. If the battery isn't full after six hours, charging stops automatically. You can't use the derailleur while it charges. If the battery temperature goes above 50°C, charging stops; that is one to contact us about.
Shifting is inaccurate
Work through these in order before you start making adjustments in the app:
- Hanger straight: looking from behind, the hanger should sit parallel to the cassette. If it's bent, straighten it or replace it.
- Hanger step: the small tab next to the derailleur fixing bolt must sit on the step at the bottom of the hanger before you tighten the bolt. If it doesn't, the derailleur can't swing. If the step is too small, fit a hanger with a larger step or use a hanger extender.
- Bolt torque: tighten the mounting bolt to 8.0–10.0 N·m. Don't grease the bolt or the hanger threads. The wrong torque can deform the hanger and spoil the shifting.
- Chain length: cut the chain to suit your chainset, cassette and frame. A chain of the wrong length can cause unreliable shifting or even system faults.
- Initial calibration: with the chain on the smallest sprocket, centre the upper jockey wheel under that sprocket. Keep the cranks turning the whole time, and never calibrate while riding.
- Tension: on the largest sprocket, the gap between the upper jockey wheel and the sprocket should be about 8–10mm.
- Limit screws (only after calibration and tension are done): turn each screw until it just touches, then back it off a quarter turn.
- Then fine-tune each gear in turn with the +R / L− buttons in Fine-tuning.
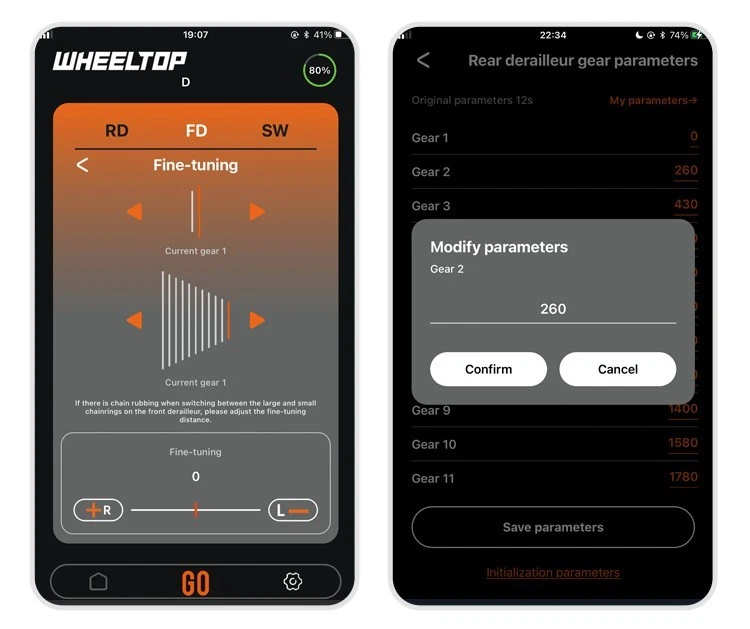
If you want to read up before you start, we've covered them in installation mistakes to avoid.
Front mech rubbing on the TX
If the chain rubs in the larger sprockets, use FD › Fine-tuning +R/L−. If it rubs in the smaller sprockets, go to FD › Initial calibration and move the guide outward. As a starting point, with the chain on the big ring, the outer cage plate should sit 1–2mm from the chain.
Buttons doing the wrong thing
These are the TX defaults:
- Right large button: shifts to a bigger sprocket.
- Right small button: shifts to a smaller sprocket.
- Left button: switches between the chainrings.
If custom button settings have got muddled, use Factory restore in the SW tab to reset them.
Lever coin cells
Each lever runs on a CR2032 coin cell, which you can change without tools. One cell usually lasts more than a year. A yellow light on the lever means the cell is running low.

What isn't covered: wear parts
Brake pads are consumables, so the warranty doesn't cover them. This is the part the rider said reassured them. On the TX disc groupset, the calipers run on mineral oil and are compatible with Shimano brake fluid. They are flat mount only, so check your frame and fork before you order.
What other buyers have said
Other TX buyers have left feedback such as "Brilliant service top product". A buyer who fitted a TX disc groupset to their son's bike wrote:
Install and tuning were dead simple.
A GeX gravel buyer also said of us: "The guys Aoeagle are very responsive and helpful."
The rider who asked the original question got a clear answer and said they'd complete the purchase shortly. If you're considering the TX hydraulic disc groupset and have questions about cover, fitting or compatibility, send us a message on eBay before you buy.